Changing the SSID on a ATX LED Hub
( Connecting an ATX Hub to the Internet )
|
this Hub is the connection from your lighting system to the internet |
Once connected, visit:
http://me.atxled.com
Default login is:
atxled / atxled
|
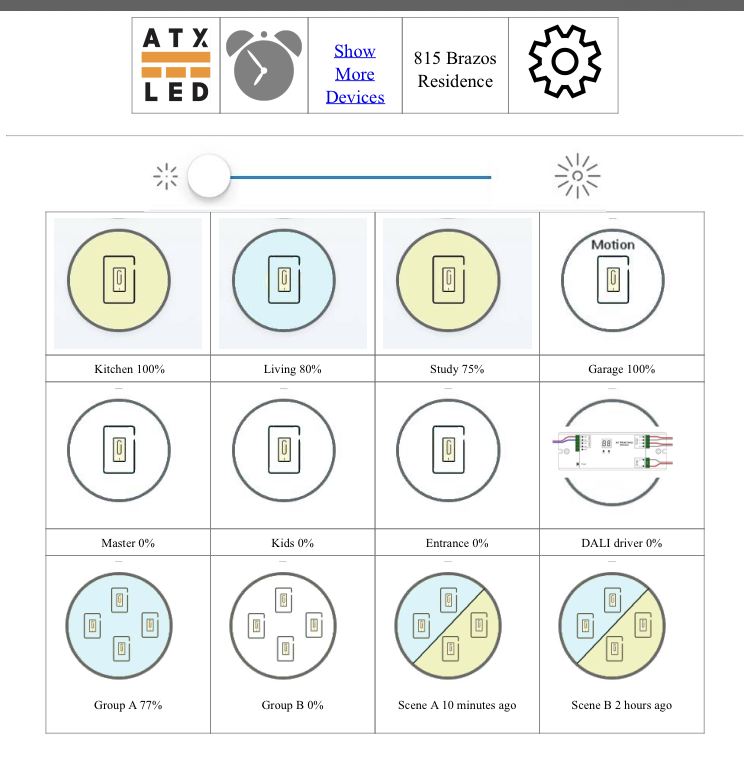
You should see this page |
You are reading this - because that page is not working - some reasons:
1
| it used to work,
WiFi Router password not changed
ATX LED says it is online
| Then either your phone is not on the same wifi network as the hub, or
your wifi is configured to use a VPN - join the house WiFi network
|
2
| it used to work, password changed or
this is a new installation
| Please see instructions below to enter new WiFi info
|
3
| When I scan the home WiFi networks - I see a network called "atxledsetup"
| The WiFi connection needs to be updated, follow the instructions below
|
Error message if you are not on the same WiFi network
(sample)
-

Trouble shooting VPN issues
If there is no problem with the wifi, and the url me.atxled.com link redirects to the correct LAN address and still does not work - be sure that
- your laptop/smartphone is on the same WiFi or LAN network as the Hub, and
- please disable any VPN
- disable Apple iPhone Relay
- insure that your WiFi allows interdevice communication
you can restart the VPN once you have the connection working.
How to Fix the SSID problem
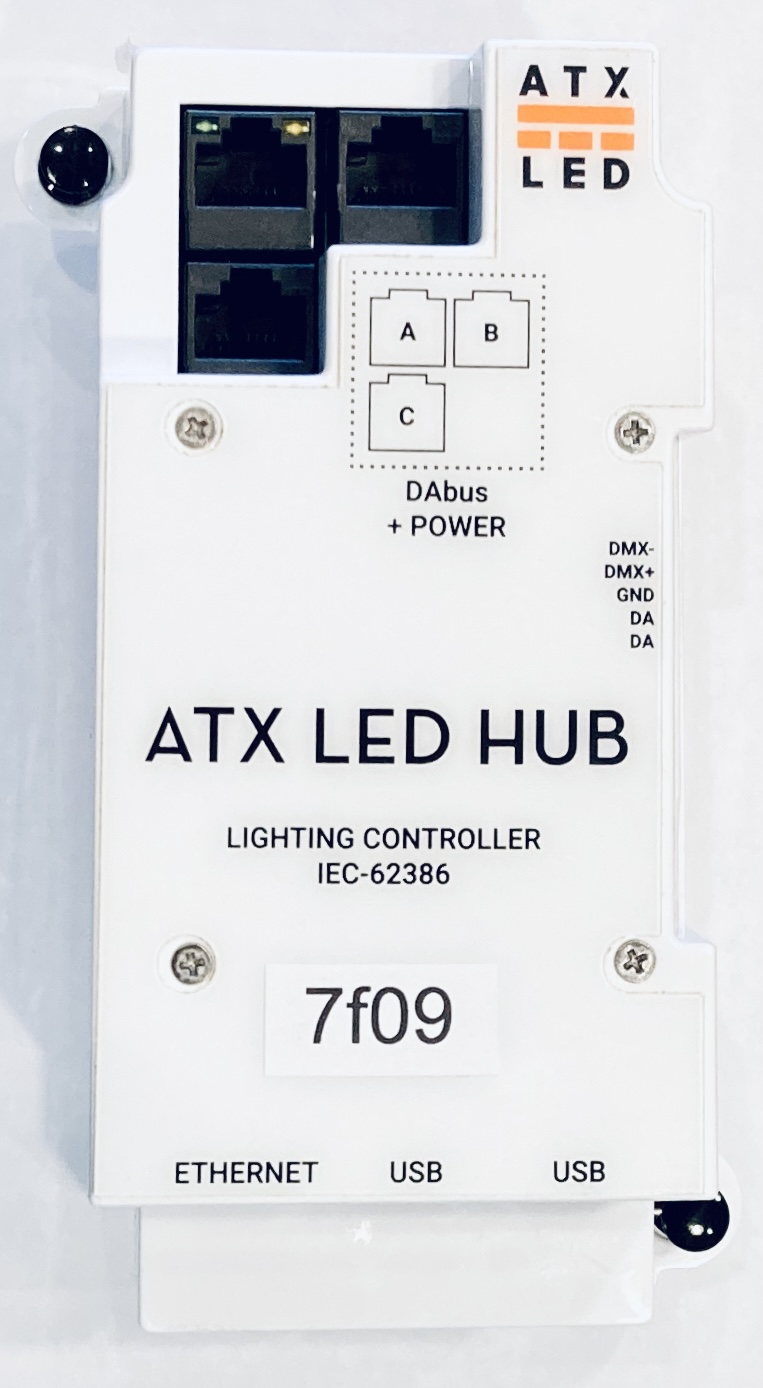
the ATX LED Hub is your house lighting Hub. It is this device here: https://atxled.com/pdf/ATX LED Hub.pdf
You are here because your hub is offline. Follow the steps below to return to operation.
detailed technical info is here: http://atxled.com/Pi
If your Hub is connected by WiFi, and if you have changed the WiFI network name ( SSID ), the hub is now offline. You need to select a new wifi network from the WiFI page - you need to get to this page, and this self help describes how to get there:
5 steps to resolution
Obviously you are Offline - your methods to get the Hub online include:
- connect to the Hub by it's built in WiFi, use that temporarily to manage the hub ( AP Mode Setup via WiFi )
- connect the Hub to your wired LAN network, use that to connect to WiFi, then remove the LAN cable ( LAN mode Setup)
- connect the Hub to your wired LAN and use it that way ( LAN Mode Operation)
- create a WiFi network with the prestored SSID
- revert to a prior stored WiFi network
AP Mode Setup via WiFi
If a wired connection is not readily available, then:
- look for the SSID signal called 'atxledwifi' with the WPA password 'atxledsetup'.
if this SSID does not appear, reboot the Hub, wait 2-3 minutes
if this SSID still does not appear after 10 minutes - another method must used ( then upgrade the Hub software )
- Enter the address 192.168.10.1:5100.
- A screen will be displayed where you can select the WiFi SSID you want and enter the password.
- Wait 2-3 minutes for the hub to connect to your network.
- enter http://me.atxled.com into your browser
Pre-Stored ATX LED WiFi SSID
If you can create a SSID in your router or personal Hot Spot, you can temporarily use the SSID “ATX LED ZWD” and password 12345678 since it is built into the Hub – so you can always connect if you create a SSID network with that combination. Once you have that setup, you can access the WiFi setup page complete the connection.
Transitional WiFi operation
While on an Ethernet connection, or if connected via WiFi, turn on your phone hotspot mode, connect to the Hub via a Laptop, associate the Hub with your phone, now that SSID is stored, you can then connect to any different WiFi network.
Ethernet Connection
( Hub software prior to version 405 )
One quick setup option (and the only reasonable one for software version 342) is to connect the hub to your network using an ethernet cable - either temporary, or as the normal connection.
Starting with version 405, the other method is to connect to the hub with wifi, and change the SSID using your smartphone or laptop. See AP Mode Setup
With older software versions, and an ethernet cable, you can connect the device to your router, change the SSID, then remove the ethernet cable again.
-
Find a long enough CAT-5 cable - a spare port on your home router, connect it to the Internet connector on the ATX LED Hub. You can see the Hub ethernet connector at the bottom of the photo. Turn the power to the Hub off and on again.
If the router is too far to be convenient, then locate a USBC charger, extract the hub from the lighting panel, and move it closer to the router, plug in the ethernet cable as shown below, then move back to the panel. Starting with 2021 installations, there are 2 black push pins that you can retract to extract the white hub from the panel.
- DO NOT connect your cable to any of the DALI A, B or C ports. It will not work. Only connect to the port marked Ethernet.
-
Connect your laptop or smartphone to the same network by wire or wireless. Power up the hub.
-
Wait about 2 minutes, then enter me.atxled.com as the address in your browser - you will get the ATX Hub page
- Click on the round "tools" icon in the top right
-
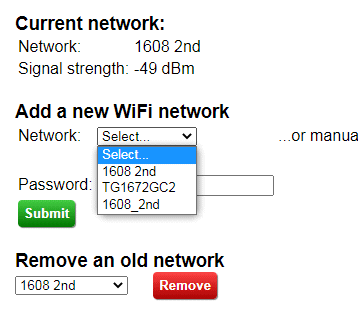
Click on the WiFi setup page, select your wifi network ( or manually enter the future network name), and enter the password, and complete
-
remove the ethernet cable and return the hub to the lighting panel if needed.

 Uploading ....